The time has come to use the View Composer to create a
suitable view for editing a PersonalAccount object.
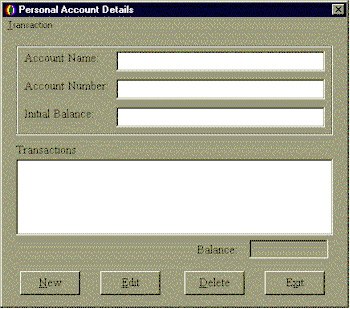
This is the view that we're going to attempt to draw.
When you're creating a view it is important to bear in mind details about the presenter to which the view will be attached., in particular, you will need to know the types and names of the sub-presenters which must to be connected to sub-views that you're drawing. In PersonalAccountShell we have:
| Sub-presenter type | Connection name | Model aspect |
|---|---|---|
| TextPresenter | 'name' | #name |
| TextPresenter | 'accountNumber' | #accountNumber |
| NumberPresenter | 'initialBalance' | #initialBalance |
| NumberPresenter | 'currentBalance' | #currentBalance |
| ListPresenter | 'transactions' | #transactions |
To open the View Composer so we can start painting choose Tools/View Composer.
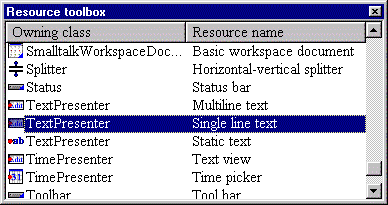
A floating toolbox of available view resources will also be displayed. This is illustrated below. Since we are going to create a shell window that will eventually be attached to a presenter which is a subclass of class Shell we'll want to see all the available view's for this class in the toolbox. Scroll down until you find Shell - Blank shell in the toolbox list and then drag this resource and drop it over the Composing Arena in the View Composer. Voila, a blank shell window to act as canvas for our view painting.
First of all we need a caption for the shell view. The two panes at the bottom right of the View Composer act as an inspector displaying the published aspects of the selected view. In the left hand pane of this Published Aspect Inspector, select caption and move to the right pane to edit its value. Type a suitable title for the shell, say, "Personal Account Details", and you'll see this appear in the shell's title bar as you type.
Tip: the right-hand pane of the Published Aspect Inspector changes according to the type of the aspect selected in the left pane. For text based aspects these are often updated as you type, but not always. Sometimes you must hit the Enter key or de-select the aspect before it is updated. Other aspects will be presented to you in different ways. A boolean value will display as a check box and some others will appear in a workspace. In the latter case, in order to it the aspect's value, you must type a Smalltalk expression and choose Accept from the Workspace menu. You'll know when you're editing in a workspace because of the distinctive background colour (only visible on high color or true color displays). Some more complicated aspects are only displayed in the right hand pane and in order to edit them you must double click the aspect entry to bring up a suitable dialog. Font and colour aspects are of this nature.
We'll take you through the creation of one of the fields to get you used to the View Composer's operation. After that, you'll be left to your own devices to finish off the remaining fields.

Now you can add the remaining fields for the other presenters; just remember to drag across an appropriate view from the toolbox (ie: one listed under the presenter's class) and name it to match the name we gave to the presenter in our #createComponents method. If in doubt check with the table of presenter types and names given above.
You can add other static decoration to your view to improve its appearance. In the example, we have added a static GroupBox view to surround the basic account details. Most views that can be associated with presenters are found in the toolbox under the presenter's class. For some views, however, it makes no sense to ever associate them with a presenter (a group box is a case in point), and these can be found associated with the view's class (GroupBox).
In order to send commands to the presenter we can add some push buttons to our view. Look for PushButtons in the toolbox and drag four plain Push buttons across.
Change the aspects of these as tabulated below but be aware when editing the command aspect that you'll be editing in a workspace. This means that you need to commit the changes using Workspace/Accept or Ctrl+S. The text aspect is easier; you just type, and the text appears immediately in the button.
| "command" aspect | "text" aspect |
|---|---|
| #newTransaction | &New |
| #editTransaction | &Edit |
| #removeTransaction | &Delete |
| #exit | E&xit |
More often, commands are initiated from menus and toolbars. The View Composer includes a Menu Composer to help with the creation of menu bars and context menus. This is accessible from within the Draw/Menu pulldown but it is beyond the scope of this tutorial to go into the details of menu building. You should find the Menu Composer fairly intuitive to use if you want to add, say, a Transaction menu to the menu bar of the shell. Such a menu could be used to send the same commands as the push buttons thus giving the user a choice of how to use the interface.
Tip: Due to a varary of Windows™ the menu bar does not appear for a shell view when editing in in the ViewComposer's arena. You can, however, test a menu bar that you've designed by choosing Test from the View menu.
The current version of the View Composer does not provide a graphical method of creating toolbars but these can be created programatically within the Published Aspect Inspector if required.
It is now time to save the created view as a resource and to test the functionality of the view-presenter pair. Choose File/Save as or press the Save button on the View Composer's toolbar. In the resultant dialog find the presenter's class that this view is to be associated with, ie: PersonalAccountShell, and select this. Then enter a name for the view resource. In this case we'll choose to call our new view "DefaultView".
Tip: the resource name for the view must match that specified in the #defaultView class method that we wrote for the corresponding presenter.
We now have a complete MVP triad for a PersonalAccount. At this stage we can test the user interface to verify how it interacts with the PersonalAccount model. In a workspace window evaluate:
PersonalAccountShell show.
You should see the view you've designed appear, displaying the contents of a newly created PersonalAccount object. In this case the PersonalAccountShell presenter that you've created also creates and owns its PersonalAccount model (it was specified by the defaultModel class method, remember). However, it's also possible to bring up a PersonalAccountShell on a model that is already in existence. If you still have the workspace variables that we created earlier, then b will be be holding a suitable personal account. Evaluate:
PersonalAccountShell showOn: b.
You should be able to see and edit the original details you entered into this account. At the moment you will not be able to add any transactions to the account since we have not completed the command handling methods that do this.
Once you've closed the shell, either by pressing Exit or with the system menu close box, inspect the contents of b and you should see the changes you have made to the account object.
Click here to move on to the next section or here to go back to the previous section.